인벤토리 시스템
ItemData.h
#pragma once

#include "CoreMinimal.h"
#include "Engine/DataTable.h" // 데이터 테이블 기능을 쓰기위해 추가!
#include "ItemData.generated.h"

class ABaseItem; // 아이템을 만들고 주석을 풉니다.

USTRUCT(BlueprintType) //구조체를 블루린트에서도 쓸 수 있게해주겠습니다
struct FItemData : public FTableRowBase // 구조체가 `데이터 테이블의 한줄`이 되도록 만드는 역할
{
	GENERATED_BODY()

public:
	UPROPERTY(EditAnywhere, BlueprintReadOnly, Category = "Item Data")
	FName ItemID; // 아이템ID Apple, Potion

	UPROPERTY(EditAnywhere, BlueprintReadOnly, Category = "Item Data")
	FText ItemName; // 유저가 보는 아이템 이름 사과, 체력포션

	UPROPERTY(EditAnywhere, BlueprintReadOnly, Category = "Item Data")
	UTexture2D* Thumbnail; // 인벤토리에서 보여줄 아이템 썸네일

	// 아이템을 만들고 주석을 풉니다.
	UPROPERTY(EditAnywhere, BlueprintReadOnly, Category = "Item Data")
	TSubclassOf<ABaseItem> ItemActorClass; // 아이템의 설계도, 아이템 드롭에서 사용
};
BaseItem.h
// Fill out your copyright notice in the Description page of Project Settings.

#pragma once

#include "CoreMinimal.h"
#include "GameFramework/Actor.h"
#include "BaseItem.generated.h"

// 전방선언 해줍니다.
class UStaticMeshComponent;

UCLASS()
class IS01_API ABaseItem : public AActor
{
	GENERATED_BODY()

public:
	ABaseItem();

protected:
	// 아이템의 외형을 담당할 변수를 만듭니다.
	UPROPERTY(VisibleAnywhere, BlueprintReadOnly, Category = "Item")
	UStaticMeshComponent* Mesh;

public:
	// ItemID를 저장할 변수, 내가 누구인지 알려주는 값
	UPROPERTY(EditAnywhere, BlueprintReadOnly, Category = "Item Data")
	FName ItemID;
};
BaseItem.cpp
// Fill out your copyright notice in the Description page of Project Settings.

#include "Items/BaseItem.h"

ABaseItem::ABaseItem()
{
	PrimaryActorTick.bCanEverTick = false;

	// 외형 컴포넌트를 생성하겠습니다!
	Mesh = CreateDefaultSubobject<UStaticMeshComponent>(TEXT("Mesh"));
	SetRootComponent(Mesh);

	// 외형을 BlockAllDynamic로 충돌 설정합니다.
	Mesh->SetCollisionProfileName(TEXT("BlockAllDynamic"));

	// 물리 시뮬레이션을 키겠습니다.
	Mesh->SetSimulatePhysics(true);
}
데이터 테이블 생성
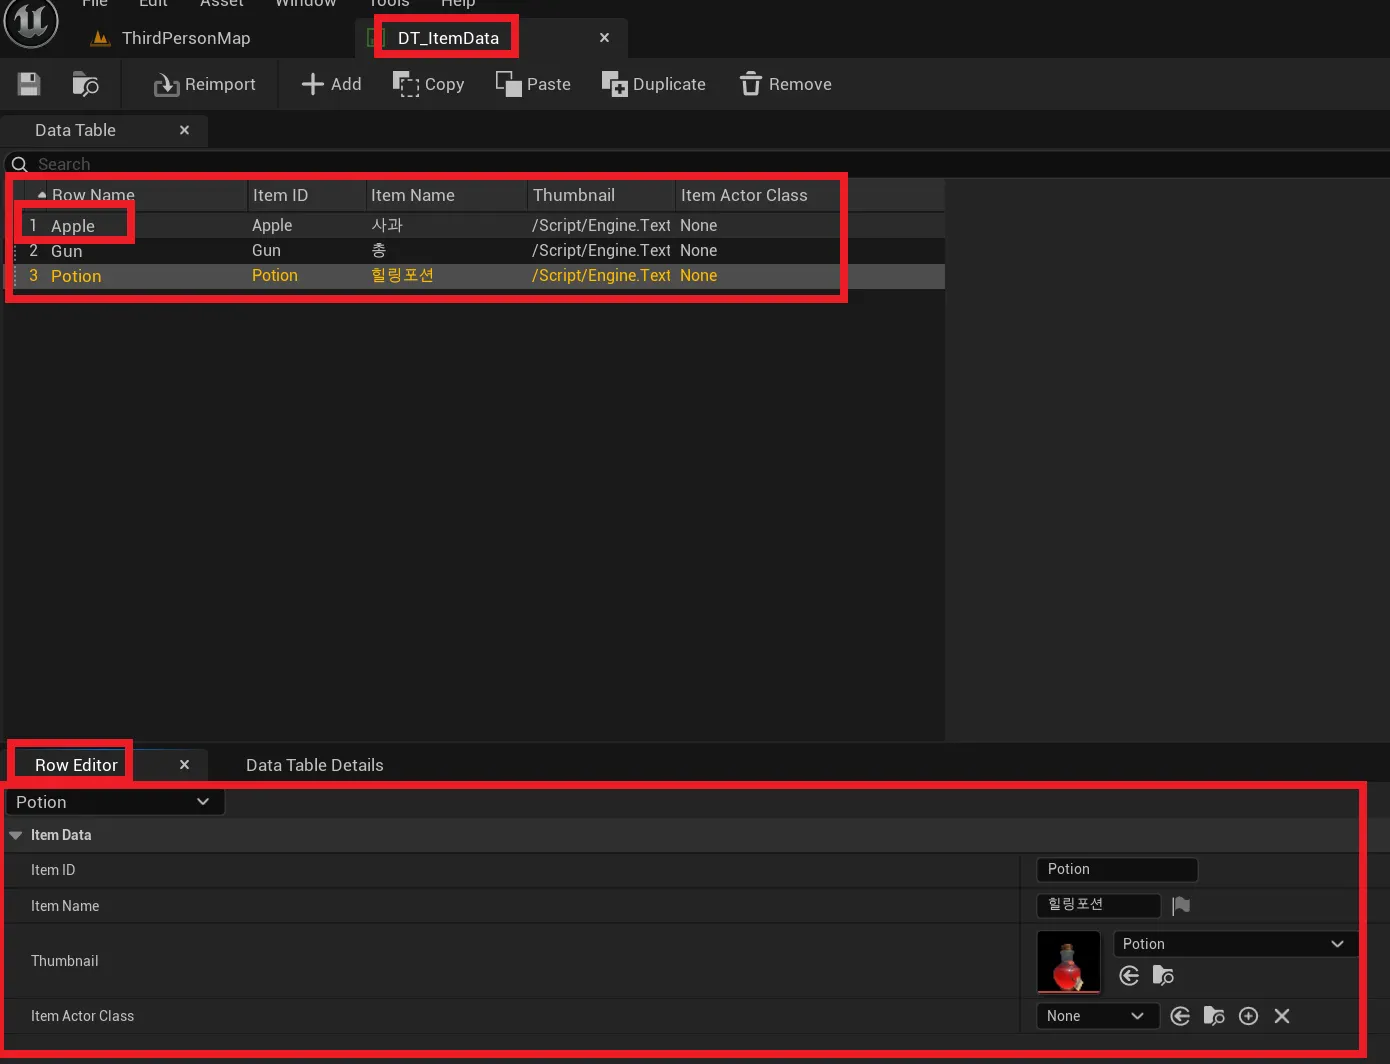
InventoryComponent.h
// Fill out your copyright notice in the Description page of Project Settings.

#pragma once

#include "CoreMinimal.h"
#include "Components/ActorComponent.h"
#include "Engine/DataTable.h" // 데이터 테이블을 사용하기위해서 필요합니다
#include "InventoryComponent.generated.h"

USTRUCT(BlueprintType)
struct FInventorySlot // 아이템슬롯 == 아이템 한칸에 들어갈 정보들
{
	GENERATED_BODY()

	UPROPERTY(EditAnywhere, BlueprintReadOnly, Category = "Inventory Slot")
	FName ItemID; // 아이템 DT_ItemData를 찾아갈 ID입니다
};

UCLASS(ClassGroup=(Custom), meta=(BlueprintSpawnableComponent))
class IS01_API UInventoryComponent : public UActorComponent
{
	GENERATED_BODY()

public:
	UInventoryComponent();

protected:
	virtual void BeginPlay() override;

public: // 멤버 변수 선언
	UPROPERTY(EditAnywhere, BlueprintReadOnly, Category = "Inventory")
	TArray<FInventorySlot> Items; // 아이템슬롯을 TArray배열로 만들어서 여러 슬롯을 가진 아이템 배열 완성

	UPROPERTY(EditDefaultsOnly, Category = "Inventory")
	int32 InventorySize = 10; // 인벤토리 크기 10칸 입니다

	UPROPERTY(EditDefaultsOnly, Category = "Inventory|UI")
	TSubclassOf<UUserWidget> InventoryWidgetClass; // 인벤토리를 시각화 하기위해서 어떤 위젯을 사용할지 담는 변수

	UPROPERTY(BlueprintReadOnly, Category = "Inventory|UI")
	UUserWidget* InventoryWidget; // 위에서 위젯을 선택하고 생성한 위젯을 담는 변수

	UPROPERTY(EditDefaultsOnly, BlueprintReadOnly, Category = "Inventory|Data")
	UDataTable* ItemDataTable; // 우리가 아까 만든 데이터 테이블을 저장할 변수


	// 멤버 함수
public:
	UFUNCTION(BlueprintCallable, Category = "Inventory")
	void AddItem(FName ItemID); // 아이템 줍는 함수, 위젯 블루프린트에서 호출(BlueprintCallable)
};
InventoryComponent.cpp
// Fill out your copyright notice in the Description page of Project Settings.


#include "Components/InventoryComponent.h"

#include "Blueprint/UserWidget.h"

UInventoryComponent::UInventoryComponent()
{
	PrimaryComponentTick.bCanEverTick = false;
}


void UInventoryComponent::BeginPlay()
{
	Super::BeginPlay();

	Items.SetNum(InventorySize); // 인벤토리 크기를 InventorySize인 10만큼 생성합니다

	if (InventoryWidgetClass) // 우리가 UE Editor에서 InventoryWidgetClass를 선택해서 넣어주면 통과 합니다
	{
		// 이 인벤토리를 가지고 있는 플레이어 컨트롤러를 가져옵니다.
		APlayerController* PlayerController = Cast<APlayerController>(GetOwner()->GetInstigatorController());

		if (PlayerController) // 플레이어 컨트롤러가 정상적으로 가져와졌다면
		{
			// CreateWidget함수를 사용해서 UUserWidget을 만들어 줍니다. 첫 번째 매개변수로 이 위젯의 소유자 PlayerController를 넣어줍니다.
			// 가져온 PlayerController에 UI에를 뛰운다! 라고 생각하면 됩니다!
			InventoryWidget = CreateWidget<UUserWidget>(PlayerController, InventoryWidgetClass);
		}
	}
}

void UInventoryComponent::AddItem(FName ItemID)
{
	// 아이템ID가 비어있는지 체크합니다.
	// NAME_None은는 FName이 비어있다는 뜻입니다.
	if (ItemID == NAME_None)
	{
		return;
	}

	// Items배열을 처음부터 끝까지 돕니다.
	for (int32 i = 0; i < Items.Num(); i++)
	{
		// 비어있는 칸이 있는지 찾습니다.
		if (Items[i].ItemID == NAME_None)
		{
			// 비어있는 칸에 주운 ItemID, Quantity를 대입합니다.
			Items[i].ItemID = ItemID;

			// 디버그 메세지로 아이템이 잘 저장되었는지 체크합니다!
			if (GEngine)
			{
				FString const Msg = FString::Printf(TEXT("아이템 저장! [ %d번 ] 슬롯에 [ %s ] 저장!"), i, *ItemID.ToString());
				GEngine->AddOnScreenDebugMessage(-1, 5.0f, FColor::Green, Msg);
			}

			// 아이템 저장했으니 AddItem함수 종료!
			return;
		}
	}

	// for문을 다 돌았는데 return이 안되고 여기 까지 왔다면
	// 인벤토리에 아이템이 다 찼습니다!
	if (GEngine)
	{
		GEngine->AddOnScreenDebugMessage(-1, 5.0f, FColor::Red, TEXT("[비상!] 인벤토리가 모두 찼습니다!"));
	}
}
Character.h 파일에서 연결
class UInventoryComponent; // 우리가 만든 클래스(타입)이 UInventoryComponent이런게 있어 라고 전방선언합니다.

// ... 생략

/** Look Input Action */
UPROPERTY(EditAnywhere, BlueprintReadOnly, Category = Input, meta = (AllowPrivateAccess = "true"))
UInputAction* LookAction;

// InventoryAction을 추가해줍시다
UPROPERTY(EditAnywhere, BlueprintReadOnly, Category = Input, meta = (AllowPrivateAccess = "true"))
UInputAction* InventoryAction;

private:
	// 메인 UI를 정할 변수
	UPROPERTY(EditDefaultsOnly, Category = "UI")
	TSubclassOf<UUserWidget> MainHUDWidgetClass;

// ... 생략

/** Called for looking input */
void Look(const FInputActionValue& Value);

// I키 눌렀을때 캐릭터에서 인벤토리 컴포넌트의 Toggle함수를 실행해주는 함수 입니다
void ToggleInventoryInput();

// ... 생략
public:
	// 우리가 만든 인벤토리 컴포넌트를 담을 변수!
	UPROPERTY(VisibleAnywhere, BlueprintReadOnly, Category = "Inventory", meta = (AllowPrivateAccess = "true"))
	UInventoryComponent* InventoryComponent;

	/** Returns CameraBoom subobject **/
	FORCEINLINE class USpringArmComponent* GetCameraBoom() const { return CameraBoom; }
Character.cpp
// 우리가 만든 인벤토리 컴포넌트를 사용하기 위해 include 해야합니다.
#include "Components/InventoryComponent.h"

// ... 생략

AIS01Character::AIS01Character()
{

	// ... 생략

	// 인벤토리 컴포넌트를 생성해줍니다!
	InventoryComponent = CreateDefaultSubobject<UInventoryComponent>(TEXT("InventoryComponent"));
}

void AIS01Character::SetupPlayerInputComponent(UInputComponent* PlayerInputComponent)
{
	// Set up action bindings
	if (UEnhancedInputComponent* EnhancedInputComponent = Cast<UEnhancedInputComponent>(PlayerInputComponent)) {

		// ... 생략

		// InventoryAction이 들어오면 ToggleInventoryInput함수를 실행시켜 줍니다.
		EnhancedInputComponent->BindAction(InventoryAction, ETriggerEvent::Started, this, &AIS01Character::ToggleInventoryInput);
	}
	else
	{
		UE_LOG(LogTemplateCharacter, Error, TEXT("'%s' Failed to find an Enhanced Input component! This template is built to use the Enhanced Input system. If you intend to use the legacy system, then you will need to update this C++ file."), *GetNameSafe(this));
	}
}

void AIS01Character::ToggleInventoryInput()
{
	// 일단 비워 둡니다.
}
Build.cs 에서 UMG 추가
Input Action 추가
UI 위젯 생성
'내일배움캠프-언리얼' 카테고리의 다른 글
| [내일배움캠프 - 언리얼] DAY 49 - 팀 프로젝트 진행 (0) | 2026.02.10 |
|---|---|
| [내일배움캠프 - 언리얼] DAY 48 - AI 특강 1부 (0) | 2026.02.09 |
| [내일배움캠프 - 언리얼] DAY 46 - 머티리얼 실습(NPR 재질 만들기) (0) | 2026.02.05 |
| [내일배움캠프 - 언리얼] DAY 45 - AnimMontage (0) | 2026.02.02 |
| [내일배움캠프 - 언리얼] DAY 44 - TA - 머티리얼 실습 (0) | 2026.01.30 |